City and Canada Bay – Thursday Morning 15th May 2025.
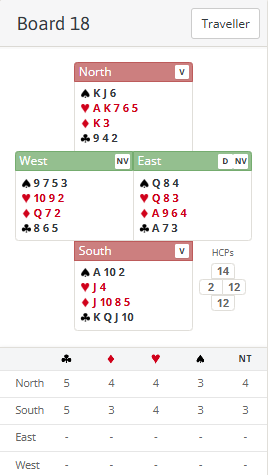
On board 18 last week North South had a combined 26 points and could make game in 3 denominations. But only 6 out of 24 pairs across the two fields reached a game. Why might that be?
I suspect the reason was a lack of clarity about the point ranges for various bids after someone “protects” the auction. Let’s have a closer look.
While a few tables played in 2♥ I suspect the auction at most tables went 1♦ P P 1♥ P 1NT end. So who should do something different? To me the answer is North. It’s all to do with the various point ranges.
After 1 of a suit, pass, pass it is often a good idea for the hand in 4th position (North here) to “protect” the auction by coming back in with a lighter hand than usual. That’s because their partner may well have had to pass over the opening bid with quite a reasonable hand. For example any balanced hand up to 14 points that isn’t suitable for a takeout double of the opening doesn’t really have a bid (a hand like that with 15+ can overcall 1NT). A good rule of thumb when bidding in these positions is to mentally add about 2 or 3 points to a hand in protective position and mentally subtract the same from the other hand (because partner has already bid some of our hand for us).
So here, while it’s still reasonable for North to bid 1♥, he should realise that he is super maximum for that action. For example I would bid 1♥ on the same hand without any of the spade honours – e.g. a 10 point hand. Here, after mentally adding 2 points, he is looking at 16. Much stronger than that and he should start with a double intending to then bid hearts.
So now the attention switches to South. He does indeed have an opening hand which couldn’t bid over 1♦ (a takeout double is far too dangerous with that shape – partner will assume he has hearts and bid them nearly all the time!) A no-trump bid now is therefore perfectly sensible and, as I said above, he should mentally subtract a bit from his hand and therefore evaluate it around a 10 point hand (the ♠A, the solid clubs and the ♦10 with the ♦J are all good features so this is quite a “good” 12 point hand in isolation). So bidding 1NT is fine. But the key point to appreciate is that bidding 1NT here is a constructive move. With up to 9, South would simply pass 1♥ (in the same way he would pass a direct 1♥ overcall from his partner).
So in this position:
- a bid of 1NT shows about 10-12 points (mentally adjusted to 8-10 because partner protected the auction); and
- a bid of 2NT shows about 13-14 (mentally adjusted to 11-12 because partner protected).
14 is the maximum South could have with this sort of hand because with 15+ he would have been able to overcall 1NT initially.
That puts the focus back on North and this I suspect is where the problems arose. In this particular auction I think North should raise 1NT to 3NT. He is super-max for his previous 1♥ bid and South has now made a constructive move. Remember South could pass the 1♥ overcall with anything up to about 9 points – it’s not the same as if North opened 1♥. You can’t afford to pass an opening bid with that much because partner could have as much as 19-20. But an overcalling hand won’t have 19-20 because a hand that big would instead start with a double (not an option available to an opening bidder!)
So, as we saw above, South’s 1NT is showing about 10-12. That means it is also not the same situation as an opening 1♥ bid followed by a 1NT response showing 6-9 (over which North clearly would pass).
Even though bidding straight to 3NT with 14 opposite what might be only 10 is a bit pushy, there’s another reason North should do so – see advanced section for what it is.
What about the play of no-trumps by South? West will surely lead a low diamond, his partner’s suit. East will win the ♦A and no doubt knock out the now singleton ♦K in dummy. Declarer should then play on clubs (a good general rule in no-trumps is to knock out certain losers like aces first – where you have a choice of plays like the spade suit here, you want to leave that until later as you might have more information to work out which way to play it). After East wins the ♣A, he will no doubt cash West’s ♦Q but that’s the last trick the defence should score. It should now be clear to finesse against East for the ♠Q – see advanced section for why.
Regular readers of the column will know I am a fan of the weak NT. On this hand East would open that (12-14) and it would be passed to North. It is now much more risky for North to bid than it is over 1♦ – see advanced section for why.
Lastly, more advanced readers might want to work out why Deep Finesse says North can make 4NT but South can only make 3NT?
Key points to note
A “protective” auction (i.e. one after 1 suit, Pass, Pass) is not the same as a normal auction. 4th seat should re-open lighter than usual (as his partner may have had to pass with a decent hand) and partner then needs to allow for that.
A 1NT response to an overcall tends to be a more constructive bid (usually about 10-12) than a 1NT response to an opening bid. You can afford to pass an overcall with 5-9 but you can’t afford to pass an opening bid with that much (partner could be 19-20 for an opening).
When playing no-trumps it’s often right to knock out your certain losers (like aces) first. You may have a choice how to play another suit later.
Remember the auction during the play. Auctions that start 1 suit, pass, pass are very revealing – the responding hand will have at most 5 points. Once you’ve seen them turn up with one card, it’s very likely their partner will have everything else that’s missing.
More advanced
Apart from the point ranges discussed, why else should North bid 3NT? Because of the auction. An auction starting 1 of suit, pass, pass often means the other side can make game with fewer than the “normal” 25/26 points. For two reasons:
- Almost all the defence’s values are in one hand so it will be hard for them to communicate with each other – the hand with all the values may well end up on lead several times and have to give tricks away;
- Declarer knows from the auction where nearly all the points are and that is often worth a trick in the play.
The 2nd reason is in fact why declarer should finesse against East for the ♠Q here. Count the points. Your side has 26 which only leaves 14. You already know the vast majority of those are with East because he opened the bidding and West passed that. After you have seen the ♦Q in the West hand and the fact that diamonds broke 4-3, it is almost certain that East must have all the other points to make up his opening bid. Yes it’s true that if West did have ♠Q he would still have passed the 1♦ opening bid as he’d still only have 4 points. But that would mean East has opened on 10 points and we also know he has a balanced hand since he opened a 4 card diamond suit.
I mentioned the auction 1NT (12-14) P P. This is very different for two reasons. Firstly the West hand is a much wider range. When he passes a 1 of a suit opening he can have at most 5 points (because the 1 level opening could be anything up to 19-20). But he could easily pass a 1NT bid with as many as 10 points since he knows his partner’s point range much more accurately. If North wades in and finds West with 10 points, his side could be in big trouble! The second reason it’s riskier for North is that he has to take action at the 2 level not the 1 level. It tends to be much easier for good pairs to take a penalty at the 2 level than the 1 level. The weak NT is in fact a form of pre-empt (and often a very effective one) – it removes the entire 1 level from the opponents!
On this hand of course if North doesn’t act over 1NT, his side miss out on a vulnerable game and might only score 150 or 200 taking 1NT several off. Today it’s right for him to bid but move some of South’s points to West and it might be very wrong! He has no way of telling – there’s no right answer and every so often he will guess wrong and get his side into trouble.
Finally why can North make 10 tricks but South can only make 9 when playing no-trumps? Usually the key to working this out is to look for a suit than can safely be led by one defender but not the other. Here that’s a heart. East can’t lead a heart because declarer will score ♥J in South and immediately have 5 heart tricks. But West can lead a heart safely. Declarer must win (otherwise the defence switch to diamonds and set two tricks up there before their ♣A is knocked out). Now when East gets in with ♣A he can switch to diamonds to set up two tricks there. We’ve already seen declarer can’t give up a heart so if he plays another diamond himself NOW the defence play another heart themselves to set up a trick there before their 2nd diamond is knocked out (East can switch to the ♥Q to squash South’s ♥J and set up West’s ♥10). Largely of academic interest only since a heart is a very unlikely lead given North has bid the suit!
Julian Foster (many times NSW representative) ♣♦♥♠