City and Canada Bay – Thursday Morning 27th February 2025.
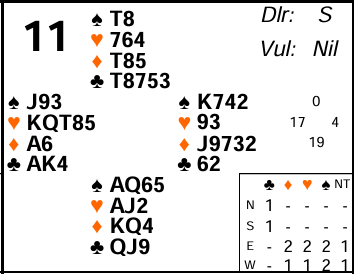
On some hands the points are very unevenly distributed and two big hands may end up effectively playing against each other. This has implications both in the bidding and in the play. Board 11 was one such board last week. Let’s have a closer look.
It looks like not a single table at either venue had the auction I would have recommended! South will most likely open 1♣ (being too strong for 1NT). His intention will be to rebid 2NT over a 1 level response from partner – usually showing 18-19 points.
West has 3 plausible choices over 1♣, each with some flaw:
- Overcall 1NT to show his strength (15-17 or thereabouts) – but that risks losing the fact that he has 5 hearts.
- Start with a simple 1♥ overcall – but that risks missing a higher contract if it gets passed out.
- Double with the plan to bid hearts later (i.e. showing a hand too good to just overcall 1♥) – but that risks the auction getting too high before he has really shown the nature of his hand.
I prefer 1♥despite the 17 points. These days, with auctions becoming ever more competitive, it’s preferable to show your suit and hope to be able to act again to show extras later (it’s very rare for a 1 level overcall to be passed out).
On this occasion 1♥ will be passed back to South since both North and East have almost nothing. At this point it’s important to understand that an auction like this where partner has passed is totally different to one where partner responded. Had partner responded he would be known to have at least 5 points. Now a 1NT rebid would typically show 11-14 balanced and a jump rebid of 2NT would show 18-19 balanced (15-17 would of course have opened 1NT to start with).
But after pass pass back to South it’s very different. Now partner might have nothing so it’s quite dangerous to wade back in. Certainly rebidding 1NT now with 11-14 would be potentially suicidal! So when partner has passed you need a stronger hand to come back in and you certainly don’t want to unnecessarily jump the bidding. Hence a 1NT bid in these circumstances should show 18-19. That’s quite enough because a big hand opposite a really bad hand usually plays badly (you don’t have entries to move between the hands so you often get stuck in the big hand and have to lead away from honours). Here that problem actually arises for both sides! It’s effectively a battle between West and South since entries to North and East are negligible.
1NT is likely to end the auction – West can’t really bid again (nor will he particularly want to now he has learned South has a really strong hand!) and certainly North and East won’t. However, given not a single table played in 1NT by South at either venue I guess no-one had that auction! Perhaps West doubled first, heard 1♠ from East and followed up with 2♥ or 2NT? Perhaps South continued with 2NT himself? Some tables even reached game which suggests either West or South got a bit too carried away!
What about the play in no-trumps by South? West has an easy lead of ♥K or ♥Q (see advanced section for more on which honour to lead and why). South should duck that. This is a very old play in bridge known as the “Bath Coup” (allegedly named after the city of Bath in England where the play was first performed in the game of whist, a predecessor to contract bridge). By ducking, it means South retains ♥AJ and now West can only continue the suit at the cost of a trick which usually means he will have to switch. It’s a very useful play – especially in no-trumps which is basically a race between the two sides to set up winners in their long suit(s). See advanced section for a bit more about this.
Here, however, West might well view to just continue hearts anyway – it’s not like anything else is appealing. See advanced section for more discussion on that. If he does then South will win and probably begin trying to set up his own long suit (clubs). West is ahead in the race though and can win and knock out South’s last heart. When South continues clubs West needs to be patient and duck one round (if he wins the 2nd round immediately, then declarer will be able to reach 3 more club winners in the North hand). Quiz – how does he know to do this? See advanced section for the answer. Once he does win, he can cash his 2 heart winners and then exit in spades or diamonds. Whatever declarer does he will lose another trick which should result in 6 tricks for South.
Some pairs played in a heart contract by West. That can be held to 7 tricks but precise defence is required (see advanced section for how). In practice it’s quite likely to make 8 tricks. Higher no-trump contracts by either side failed by quite a few tricks – due both to lack of entries between the hands and simply nowhere near enough points!
Key points to note
After 1X 1Y Pass Pass, a rebid of 1NT shows 18-19 (you need to be stronger than a minimum opening hand because partner passed and is likely to be extremely weak).
Be cautious when bidding with big hands opposite bad hands – they can play surprisingly badly as you keep getting stuck in the big hand and have to lead away from honours.
When you hold AJx of a suit and your left hand opponents leads the K or Q, ducking is referred to as the “Bath coup” – and means the opponent either has to switch or give you a trick.
More advanced
Which honour West leads from this holding is usually a matter of partnership agreement. Many pairs just lead the top of a sequence of honours. A method I like, however, is K for count, AQ for attitude. This means the honour you lead varies depending on the signal you want from partner. With the sort of holding in this hand you usually want to know where the Jack is – i.e. whether it’s safe to continue the suit. So here you could lead the ♥Q asking partner to give you an attitude signal. With some other holdings (e.g. AKQxxx or KQJxx) you want to know the count to work out how many rounds to cash – so there you could lead the K to get that signal. Here, if you did lead ♥Q, East should play whatever his side’s discouraging card is. That should tell West that declarer has ♥AJx(x). Like every method, though, it does have a downside. Partner can’t always tell whether the lead of the Q is from QJ or KQ. Occasionally he might overtake the Q with his Ace (thinking declarer has the K) and compress a trick by crashing the defence’s honours!
On this hand, despite knowing a heart continuation is going round into declarer’s ♥AJ, West might just continue hearts anyway. Why? Because he knows he has virtually all the defence’s points so he will get on lead many times and his partner might never get in in time to lead the suit through for him. So he’s better off accepting the loss of a heart trick but still retaining the tempo advantage. Indeed he can see he will be getting on lead at least twice more so he will always be able to get his long heart winners if he just keeps going with the suit.
The classic Bath Coup position is the one in this hand. But it’s not the only one. Suppose dummy had Axx and declarer had Jxx? After the K is led (assuming the leader will have both honours) ducking is equally effective. But note the difference if dummy had Jxx and declarer had Axx. Now you want to win the A because the J will be sitting over the remaining honour and will serve as another stop or trick (the defender will no doubt be wincing that he led the suit to start with!) Ducking is most effective in no-trumps of course but can also be important in a suit contract as forcing a switch can be to declarer’s advantage. Sometimes you can’t afford to duck though. For example playing in a suit contract after LHO opened a weak two he might well be leading from KQxxxx and ducking will just mean he can continue the suit and give his partner a ruff!
I said West needed to duck when South continues clubs. He should know to do this because his partner should have given him a count signal on the 1st round. Playing reverse count, say, East should play ♣2 showing 2, and hence giving declarer 3 (note if East’s ♣2 happened to be singleton then that gives declarer 4 clubs and the long suit can’t be cut off so there’s no point West ducking). The one holding East cannot have when he plays ♣2 is 3 of them. If he did have 3 he should play high on the 1st round so now West knows declarer has 2 and can win the 2nd round of clubs to cut dummy off.
Hearts from West can be held to 7 tricks but only on a spade lead. South can win ♠AQ and then give his partner a ruff. Next North must switch to a trump which South wins and continues with ♥J. Yes this gives declarer 4 trumps but it means he can’t ruff a club in dummy, or reach the now winning ♠K. He is limited to 4 trumps and 3 minor suit top winners. On a club or diamond lead, declarer can immediately ruff a club to dummy. That also gives him a vital entry to be able to lead a heart to the ♥10 which secures 4 trumps. That means he’ll win at least 4 trumps, 3 minor suit winners and 1 club ruff in dummy. He may well also end up making a spade trick too. Another variation is a trump lead. This stops the club ruff but now declarer can play spades himself. If he picks it right, he’ll start with ♠3,8,K,A. Then on the next round with his ♠J9 remaining he can lead the ♠J to pin North’s ♠10 and set up his ♠9 as his 8th trick once South has won ♠Q. The defence need to have taken their spade ruff to stop that being possible.
There’s a possible case for North to lead a spade – shortage leads are more effective from weak hands as there’s more chance partner has the entries you need to give you your ruff. Then again, if South opened 1♣, no-one is going to crime North for simply leading a club!
Julian Foster (many times NSW representative) ♣♦♥♠